A cool thing I just discovered will working on the WPMovieLibrary tabbed metabox: use CSS siblings and :target pseudo-class to build a full-CSS tab menu.
Siblings works with the ~ combinator to target elements from the same container if the second element is preceded by the first; The :target pseudo-class can be used to style an element targeted by an identifier in the URI. Combine the two and you can style a target link — the tab menu link — and the targeted panel.
Two things to take into account: the menu has to be located after the panels, and both menu and panels have to be children of the same parent element. In my case it meant I had to modify a bit the way the tabs were built, which involving some floating and margins (vertical menu). If you’re using an horizontal menu you’ll have to play with positions to have your menu showing on top of your tabs.
I’m not going to develop the coding part, CSS-Tricks and Nathan Faubion did that for you already. As mention on the former, this is far from an ideal technique to build tabs, the biggest inconvenient IMHO is that relying on URI identifier makes the user jump through the page, which is pretty dirty is you’re dealing with massive tabs.
That said, it’s a very useful trick to provide minimal tabbing as a fall-back for JS-disabled pages. In my case the WordPress Dashboard is very limited if you don’t have JS enabled, but it happens, either by the user’s will or a bug causing JS errors and preventing your nice JS-powered tab to work, so it’s always nice to provide some alternative to make sure a tabbed metabox somehow works in every situation.
I’ve been playing with WordPress’ WP_List_Table for a while now, but since the first day the truly missing feature was an AJAX loading. And I finally managed to find time to put some work on it, I couldn’t find any real documentation about we actually do that, apart from a two-years old StackExchange question that doesn’t provide a full solution. So, here’s what I came up with.
Digging through the core
If you’re not the kind of archaeology guy, you may skip to the next part.
When you don’t find any worthy doc about something you’re trying to build on WordPress, a good thing is to search through the source code to find any clue: undocumented functions you may have missed, hooks you never heard about… I came across both. Looking for classes extending WP_List_Table and using a 'ajax' => true parameter, I quickly found /wp-admin/includes/class-wp-themes-list-table.php, and a encouraging line mentioning a _ajax_fetch_list_nonce Nonce field. This nonce lead me to the /wp-admin/includes/class-wp-themes-list-table.php file, and then again a line mentioning a _get_list_table() function that fetches an instance of a WP_List_Table class. That’s great, except that it’s a private function, meaning we can’t use it. Too bad. But, we have a full example of how to use AJAX: we need to use an AJAX action filter to create an instance of our custom WP_List_Table class, and then call the WP_List_Table->ajax_response() method. Yeah, it looks easy now that we know what to do!
Custom AJAX List Table Example
Beware, from here we’ll be using a plugin; all that follows suppose you know at least what you’re doing with WP_List_Table. We’ll implement a custom post type and add a new admin page for testing purpose; I will not detail these parts, I used Matt Van Andel‘s very well documented Custom List Table Example as a starting base and updated it to implement AJAX. You can see the full plugin file on GitHub.
Activate AJAX
The first thing to do is to add a parameter to the WP_List_Table__construct() method, indicating we’re using AJAX on this class:
function __construct() {

	global $status, $page;

	//Set parent defaults
	parent::__construct(
		array(
			//singular name of the listed records
			'singular'	=> 'movie',
			//plural name of the listed records
			'plural'	=> 'movies',
			//does this table support ajax?
			'ajax'		=> true
		)
	);

}
Now you can just forget about it, we will not be using it today. Truth to tell, I’m not even sure about what it really does; I guess it can become handy if you need to call specific actions whether using AJAX or not. I’m interested in any better explanation!
Edit: As Matt detailed in the comments, setting 'ajax' => true makes WP_List_Table automatically call the private _js_vars() method, which adds to the footer a set of useful Javascript variables.
Set order in pagination arguments
If we want to be able to sort tables through AJAX, will need a way to access the ordering values, order and orderby, at any time; fine, we’ll just add them to the class’ _pagination_args:
$this->set_pagination_args(
	array(
		//WE have to calculate the total number of items
		'total_items'	=> $total_items,
		//WE have to determine how many items to show on a page
		'per_page'	=> $per_page,
		//WE have to calculate the total number of pages
		'total_pages'	=> ceil( $total_items / $per_page ),
		// Set ordering values if needed (useful for AJAX)
		'orderby'	=> ! empty( $_REQUEST['orderby'] ) && '' != $_REQUEST['orderby'] ? $_REQUEST['orderby'] : 'title',
		'order'		=> ! empty( $_REQUEST['order'] ) && '' != $_REQUEST['order'] ? $_REQUEST['order'] : 'asc'
	)
);
This action should be put at the end of your WP_List_Tableprepare_items() method.
Nonce and order inputs
This time we will add some more code to your class’ display() method; as its name let it figure it is the method that will render the final table. We want to add a Nonce field for security, and a couple of hidden input that will store the order and orderby values, so that we can use them later with jQuery.
This would be the most important part: the ajax_response() method, the very method that will gather and display the update table rows and elements.
The first thing we do is check the nonce, and only then, we prepare the items. The method will return an array in the form of a JSON string containing:
column_headers: string containing the table header’s HTML content
pagination: array containing top and bottom table navs’ HTML content
rows: string containing the requested table rows
total_items_i18n: string containing the translated number of items (unused here)
total_pages: int containing the number of pages (unused here)
total_pages_i18n: string containing the translated number of pages (unused here)
We use output buffering a few times; it may not always be a wise choice to do so, the point here is to avoid rewriting a couple of big methods. We need to call WP_List_Table->pagination() (two times, top and bottom) and WP_List_Table->print_column_headers() (one time), methods that both echo the HTML result instead of return it; for the sake of simplicity I prefer to use output buffering rather than copying the two methods in each class I have only to add a return option.
Almost done with PHP! All we need to do is handle our hook.
function _ajax_fetch_custom_list_callback() {

	$wp_list_table = new TT_Example_List_Table();
	$wp_list_table->ajax_response();
}
add_action('wp_ajax__ajax_fetch_custom_list', '_ajax_fetch_custom_list_callback');
The jQuery part
That’s the part that will capture links click events, send AJAX calls and handle the HTML update. It’s quite simple if not short:
(function($) {

list = {

	/**
	 * Register our triggers
	 *
	 * We want to capture clicks on specific links, but also value change in
	 * the pagination input field. The links contain all the information we
	 * need concerning the wanted page number or ordering, so we'll just
	 * parse the URL to extract these variables.
	 *
	 * The page number input is trickier: it has no URL so we have to find a
	 * way around. We'll use the hidden inputs added in TT_Example_List_Table::display()
	 * to recover the ordering variables, and the default paged input added
	 * automatically by WordPress.
	 */
	init: function() {

		// This will have its utility when dealing with the page number input
		var timer;
		var delay = 500;

		// Pagination links, sortable link
		$('.tablenav-pages a, .manage-column.sortable a, .manage-column.sorted a').on('click', function(e) {
			// We don't want to actually follow these links
			e.preventDefault();
			// Simple way: use the URL to extract our needed variables
			var query = this.search.substring( 1 );

			var data = {
				paged: list.__query( query, 'paged' ) || '1',
				order: list.__query( query, 'order' ) || 'asc',
				orderby: list.__query( query, 'orderby' ) || 'title'
			};
			list.update( data );
		});

		// Page number input
		$('input[name=paged]').on('keyup', function(e) {

			// If user hit enter, we don't want to submit the form
			// We don't preventDefault() for all keys because it would
			// also prevent to get the page number!
			if ( 13 == e.which )
				e.preventDefault();

			// This time we fetch the variables in inputs
			var data = {
				paged: parseInt( $('input[name=paged]').val() ) || '1',
				order: $('input[name=order]').val() || 'asc',
				orderby: $('input[name=orderby]').val() || 'title'
			};

			// Now the timer comes to use: we wait half a second after
			// the user stopped typing to actually send the call. If
			// we don't, the keyup event will trigger instantly and
			// thus may cause duplicate calls before sending the intended
			// value
			window.clearTimeout( timer );
			timer = window.setTimeout(function() {
				list.update( data );
			}, delay);
		});
	},

	/** AJAX call
	 *
	 * Send the call and replace table parts with updated version!
	 *
	 * @param    object    data The data to pass through AJAX
	 */
	update: function( data ) {
		$.ajax({
			// /wp-admin/admin-ajax.php
			url: ajaxurl,
			// Add action and nonce to our collected data
			data: $.extend(
				{
					_ajax_custom_list_nonce: $('#_ajax_custom_list_nonce').val(),
					action: '_ajax_fetch_custom_list',
				},
				data
			),
			// Handle the successful result
			success: function( response ) {

				// WP_List_Table::ajax_response() returns json
				var response = $.parseJSON( response );

				// Add the requested rows
				if ( response.rows.length )
					$('#the-list').html( response.rows );
				// Update column headers for sorting
				if ( response.column_headers.length )
					$('thead tr, tfoot tr').html( response.column_headers );
				// Update pagination for navigation
				if ( response.pagination.bottom.length )
					$('.tablenav.top .tablenav-pages').html( $(response.pagination.top).html() );
				if ( response.pagination.top.length )
					$('.tablenav.bottom .tablenav-pages').html( $(response.pagination.bottom).html() );

				// Init back our event handlers
				list.init();
			}
		});
	},

	/**
	 * Filter the URL Query to extract variables
	 *
	 * @see http://css-tricks.com/snippets/javascript/get-url-variables/
	 *
	 * @param    string    query The URL query part containing the variables
	 * @param    string    variable Name of the variable we want to get
	 *
	 * @return   string|boolean The variable value if available, false else.
	 */
	__query: function( query, variable ) {

		var vars = query.split("&");
		for ( var i = 0; i <vars.length; i++ ) {
			var pair = vars[ i ].split("=");
			if ( pair[0] == variable )
				return pair[1];
		}
		return false;
	},
}

// Show time!
list.init();

})(jQuery);
And that’s about it
Voilà! You should now have nice AJAX loading List Table in your plugins and themes. This is a very basic example and should serve as a base to build extended List Tables, suggestions and advice are welcomed! A coming-soon feature on this will be an History update to change URL and keep track of the visited page. Until then, you can download the latest dev version on GitHub, fork on GitHub, leave a comment, buy me a beer… Your call!
This is a recurring I have with my website: I can’t get my WordPress Network to work properly when using different, unrelated domains.
Both my personal and professional blog (blog.charliemerland.me and blog.caercam.org) from the same WordPress installation, as well as my Themes Demo site (themes.caercam.org). I read a lot about WordPress MU Domain Mapping, spend quite a lot of time reading StackExchange threads; I found a lot of answers, too, but nothing that would work for me. Here’s what I figured out.
Set up
I have three sites in my Network:
Blog | CaerCam.org
Blog | Charlie MERLAND
WordPress Themes
My Domain Mapping options are:
☑ Remote Login
☑ Permanent redirect (better for your blogger’s pagerank)
☐ User domain mapping page
☑Redirect administration pages to site’s original domain (remote login disabled if this redirect is disabled)
☑Disable primary domain check. Sites will not redirect to one domain name. May cause duplicate content issues.
Lose control over at least one site, possibly all of them: « ERROR: Cookies are blocked or not supported » error
Cripple at least one site, possibly all of them: all permalinks redirect to the main site
The only I found to make things work is to alter mu /wp-content/sunrise.php file, commenting the Cookie related line:
if ( !defined( 'SUNRISE_LOADED' ) )
	define( 'SUNRISE_LOADED', 1 );

// Comment this
//if ( defined( 'COOKIE_DOMAIN' ) ) {
//	die( 'The constant "COOKIE_DOMAIN" is defined (probably in wp-config.php). Please remove or comment out that define() line.' );
//}

// let the site admin page catch the VHOST == 'no'
$wpdb->dmtable = $wpdb->base_prefix . 'domain_mapping';
$dm_domain = $wpdb->escape( $_SERVER[ 'HTTP_HOST' ] );
Yes, that’s not a clean way to proceed, there might be a better solution (think of me when you find it!), but still, it works. This post is as much a reminder to myself in case I broke everything in a few months as it can be a piece of help for someone bumping into the same issue.
Prior to anything this should be very clear from the start: CAPTCHAs and/or HoneyPots are commonly used, really efficient techniques to counter spam on forums. The point here is not to encourage not using these techniques, but to provide a quick and simple technique I’ve been using for years and that proved to be working on a lot of forums I own and/or use. If you have a FluxBB forum that is subject to heavy spamming attacks, you may want to take a look at better and stronger solutions like SpamBarrier or StopForumSpam.
The idea
The idea behind CAPTCHAs and similar antispam systems is that robots can’t guess every question or operation a human may have to proceed through to register on a forum/website. One thing you need to register is most generally an email address; that’s a good place to check whether you’re dealing with a human or not. If he’s a human, he will most likely notice the information right above the email fields stating that he must alter the first email field to include a magic keyword.
How we do it
Long story short, we store a short string in the database that users will need to add somewhere in one of the email address fields; when a registration is attempted, we check the email submitted for the magic word. If the mail contains it, then it should be human; if it doesn’t, most likely not human, throw an error. You may ask, what if users didn’t read carefully enough and didn’t notice they had to alter their email? Once they bump into an error they’ll should be more attentive to anything the error says, so we just inform them they may have missed something and that should be enough. For the record, I’ve never had any feedback about users unable to register because of this. Some take a few tries to register because they indeed didn’t read what they should have, but nothing more.
Note that all of this depends on thing: you need to activate the registration verification option in FluxBB, which is a good thing anyway. It sends a random password to the registering user, testing if the email address he provided is actually his and is working. The reg verify option also add the need to input the email address twice, which is exactly what we need.
register.php
The main modification is, unsurprisingly, done to register.php. Three different blocks are required.
Language
Around line 23, find:
// Load the register.php/profile.php language file
require PUN_ROOT.'lang/'.$pun_user['language'].'/prof_reg.php';
<?php
// Antispam MailTrick
$position  = $pun_config['o_asmt_magic_position'];
$magick    = $pun_config['o_asmt_magic'];
$separator = $pun_config['o_asmt_magic_separator'];
$mail_field = ( $pun_config['o_asmt_mail_field'] == 1 ? $lang_asmt['First'] : $lang_asmt['Second'] );

// Magic word have to be before anything? Separator goes after magic word.
if ( in_array( $position, array( '1', '3' ) ) )
	$magick = $magick . $separator;
// Magic word have to be after anything? Separator goes before.
else if ( in_array( $position, array( '2', '4' ) ) )
	$magick = $separator . $magick;

// This is messy, but it works.
$pos = array( '1' => $lang_asmt['Before email'], '2' => $lang_asmt['After email'], '3' => $lang_asmt['Before @'], '4' => $lang_asmt['After @'] );
$position = $pos[ $position ];
?>
						<p><?php printf( $lang_asmt['Antispam info'], $mail_field, $position, strlen( $magick ), $magick ); ?></p>
Plugin Setting page
In your forum’s plugin directory create a AP_AntispamMailTrick.php file:
<?php
/**
*
*
* @package AntispamMailTrick
* @author Charlie MERLAND
* @author_uri http://www.caercam.org
* @version 1.0.0
* @copyright Copyright (C)2014 Charlie MERLAND
* @license: GPL version 2 or higher
* @license_uri http://www.gnu.org/licenses/gpl.html
*/
// Make sure no one attempts to run this script "directly"
if ( ! defined( 'PUN' ) )
exit;
// Tell admin_loader.php that this is indeed a plugin and that it is loaded
define( 'PUN_PLUGIN_LOADED', 1 );
define( 'PLUGIN_VERSION', '1.0.0' );
define( 'PLUGIN_URL', 'admin_loader.php?plugin=AP_AntispamMailTrick.php' );
if ( file_exists( PUN_ROOT . 'lang/'.$admin_language.'/asmt.php' ) )
require PUN_ROOT . 'lang/'.$admin_language.'/asmt.php';
else
require PUN_ROOT . 'lang/English/asmt.php';
// Default settings
$default = array(
// Magic word in the first email field
'mail_field' => 1,
// Random 4 chars long magic word
'magic' => substr( str_shuffle( str_repeat( 'ABCDEFGHIJKLMNOPQRSTUVWXYZabcdefghijklmnopqrstuvwxyz0123456789', 4 ) ), 0, 4 ),
// Underscore to separate magic word from email
'magic_separator' => '_',
// Magic word before the email
'magic_position' => 1
);
if ( isset( $_POST['form_sent'] ) ) {
confirm_referrer( 'admin_loader.php?plugin=AP_AntispamMailTrick.php', $lang_common['Bad referer'] );
$o_asmt = array();
// Parse submitted settings
$o_asmt['mail_field'] = ( isset( $_POST['form']['mail_field'] ) && in_array( $_POST['form']['mail_field'], array( 1, 2 ) ) ? $_POST['form']['mail_field'] : $default['mail_field'] );
$o_asmt['magic'] = ( isset( $_POST['form']['magic'] ) && $_POST['form']['magic'] != '' ? pun_htmlspecialchars( $_POST['form']['magic'] ) : $default['magic'] );
$o_asmt['magic_separator'] = ( isset( $_POST['form']['magic_separator'] ) && $_POST['form']['magic_separator'] != '' ? pun_htmlspecialchars( $_POST['form']['magic_separator'] ) : $default['magic_separator'] );
$o_asmt['magic_position'] = ( isset( $_POST['form']['magic_position'] ) && in_array( $_POST['form']['magic_position'], array( 1, 2, 3, 4 ) ) ? $_POST['form']['magic_position'] : $default['magic_position'] );
// Update settings
foreach ( $o_asmt as $name => $value ) {
$db->query( 'UPDATE ' . $db->prefix . 'config SET conf_value="' . $value . '" WHERE conf_name="o_asmt_' . $name . '"' ) or error( 'Unable to update the configuration', __FILE__, __LINE__, $db->error() );
}
// Regenerate the config cache
require_once PUN_ROOT . 'include/cache.php';
generate_config_cache();
redirect( PLUGIN_URL, $lang_asmt['Settings updated redirect'] );
}
else {
// Check if settings exist
$sql = 'SELECT * FROM ' . $db->prefix . 'config WHERE conf_name IN ("o_asmt_mail_field", "o_asmt_magic", "o_asmt_magic_separator", "o_asmt_magic_position")';
$result = $db->query( $sql ) or error( 'Unable to get config', __FILE__, __LINE__, $db->error() );
// Settings not found, set default
if ( ! $db->fetch_assoc( $result ) ) {
foreach ( $default as $name => $value ) {
$db->query( 'INSERT INTO '.$db->prefix.'config (conf_name, conf_value) VALUES ("o_asmt_'.pun_htmlspecialchars( $name ).'", "'.pun_htmlspecialchars( $value ).'")' ) or error( 'Unable to set default config', __FILE__, __LINE__, $db->error() );
}
// Regenerate the config cache
require_once PUN_ROOT . 'include/cache.php';
generate_config_cache();
}
// Display the admin navigation menu
generate_admin_menu( $plugin );
?>
<div id="exampleplugin" class="plugin blockform">
<h2><span>Spam MailTrick v<?php echo PLUGIN_VERSION ?></span></h2>
<div class="box">
<div class="inbox">
<p><?php echo $lang_asmt['Antispam intro'] ?></p>
<?php if ( $pun_config['o_regs_verify'] == '0' ) : ?>
<p><?php echo $lang_asmt['Antispam reg verify'] ?></p>
<?php endif; ?>
</div>
</div>
</div>
<div class="blockform">
<h2 class="block2"><span><?php echo $lang_asmt['Settings'] ?></span></h2>
<div class="box">
<form method="post" action="<?php echo PLUGIN_URL; ?>">
<div class="inform">
<input type="hidden" name="form_sent" value="1" />
<fieldset>
<legend><?php echo $lang_asmt['Options'] ?></span></legend>
<div class="infldset">
<table class="aligntop">
<tr>
<th scope="row"><?php echo $lang_asmt['Email field'] ?></th>
<td>
<label><input type="radio" name="form[mail_field]" value="1"<?php if ( $pun_config['o_asmt_mail_field'] == '1' ) echo ' checked="checked"' ?> /> Email #1</label>
<label><input type="radio" name="form[mail_field]" value="2"<?php if ( $pun_config['o_asmt_mail_field'] == '2' ) echo ' checked="checked"' ?> /> Email #2</label>
</td>
</tr>
<tr>
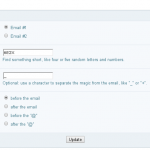
<th scope="row"><?php echo $lang_asmt['Magic word'] ?></th>
<td>
<label><input type="text" name="form[magic]" value="<?php if ( $pun_config['o_asmt_magic'] != '' ) echo $pun_config['o_asmt_magic'] ?>" /><br /><?php echo $lang_asmt['Magic word info'] ?></label>
</td>
</tr>
<tr>
<th scope="row"><?php echo $lang_asmt['Separator'] ?></th>
<td>
<label><input type="text" name="form[magic_separator]" value="<?php if ( $pun_config['o_asmt_magic_separator'] != '' ) echo $pun_config['o_asmt_magic_separator'] ?>" /><br /><?php echo $lang_asmt['Separator info'] ?></label>
</td>
</tr>
<tr>
<th scope="row"><?php echo $lang_asmt['Position'] ?></th>
<td>
<label><input type="radio" name="form[magic_position]" value="1"<?php if ( $pun_config['o_asmt_magic_position'] == '1' ) echo ' checked="checked"' ?> /> <?php echo $lang_asmt['Before email'] ?></label>
<label><input type="radio" name="form[magic_position]" value="2"<?php if ( $pun_config['o_asmt_magic_position'] == '2' ) echo ' checked="checked"' ?> /> <?php echo $lang_asmt['After email'] ?></label>
<label><input type="radio" name="form[magic_position]" value="3"<?php if ( $pun_config['o_asmt_magic_position'] == '3' ) echo ' checked="checked"' ?> /> <?php echo $lang_asmt['Before @'] ?></label>
<label><input type="radio" name="form[magic_position]" value="4"<?php if ( $pun_config['o_asmt_magic_position'] == '4' ) echo ' checked="checked"' ?> /> <?php echo $lang_asmt['After @'] ?></label>
</td>
</tr>
</table>
</div>
</fieldset>
</div>
<p class="submitend"><input type="submit" name="save" value="<?php echo $lang_admin_common['Update'] ?>" /></p>
</form>
</div>
</div>
<?php
}
?>
i18n
Last step, in your lang/English directory, create a asmt.php file:
<?php
// Language definitions used in Antispam MailTrick
$lang_asmt = array(
'Settings updated redirect' => 'Settings updated. Redirecting …',
'Antispam intro' => '<strong>AntiSpam Mail Trick</strong> is an antispam alternative to CAPTCHAs and other HoneyPots solution. It uses a simple trick to detect non-human registration by check the submitted email for a specific keyword the user need to enter.',
'Antispam reg verify' => 'You don\'t have the registration verification option activated, you need it for the antispam to work properly. Activate it in the <a href="/admin_options.php">Admin Options registration section</a>.',
'Settings' => 'Settings',
'Options' => 'Options',
'Email field' => 'Email field to trick',
'Magic word' => 'Magic word',
'Magic word info' => 'Find something short, like four or five random letters and numbers.',
'Separator' => 'Separator',
'Separator info' => 'Optional: use a character to separate the magic from the email, like "_" or "+".',
'Position' => 'Position',
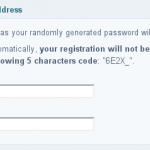
'Antispam info' => 'To prevent robots from registering automatically, <strong>your registration will not be valid unless the <u>%s</u> email contains, %s, the following %d characters code</strong>: "%s".',
'First' => 'first',
'Second' => 'second',
'Before email' => 'before the email',
'After email' => 'after the email',
'Before @' => 'before the "@"',
'After @' => 'after the "@"',
'Invalid email' => 'The email address you entered is invalid. It is most likely that you failed the anti-spam test: you need to add a magic word in your email address… Read the comments carefully ;-)',
);
Conclusion
And that’s about it. The great advantage of this technique is that it can be done in only two lines of code if you strip it to the minimal: if on of the email doesn’t contain a special code, throw an error. This version is more elaborate and comes with a bunch of settings to change easily the magic code, chose where it should be placed, chose a separator, which email field to check… It doesn’t bother users with unreadable images like CAPTCHAs, and doesn’t come with the heavy artillery a honeypot represents; it isn’t bullet-proof either, but have proved to be very efficient on forums I know that were literally under constant assault from spambots and seldom see one anymore.
What it looks like in action:
FluxBB Antispam MailTrick Registration error
FluxBB Antispam MailTrick Registration form
FluxBB Antispam MailTrick Settings page
I plan to put all this in a clean and well tested package to be released as a FluxBB Mod; will keep track of the updates here.
Storify is a nice archiving service for social medias; create a new story and you can use it to embed Tweets, Facebook posts, YouTube videos, Instagram pictures… It becomes really handy on Twitter if you want to archive a long series of Tweets you want to be able to find later without browsing manually the author Timeline for ages. You can find more on the service’s website: http://storify.com/tour.
Yesterday a client of mine asked me if and how he could save all his Storify Stories as text files. The point is he wanted to be able to print them as text for his wife to read them, and thinking about an easy solution for him to do that I actually thought it may not be that bad an idea to save contents from social networks that can get easily lost. If one posts a great story on Twitter, Storify it and six months later delete his Twitter and/or Storify, the great story is ad patres for good. Too bad.
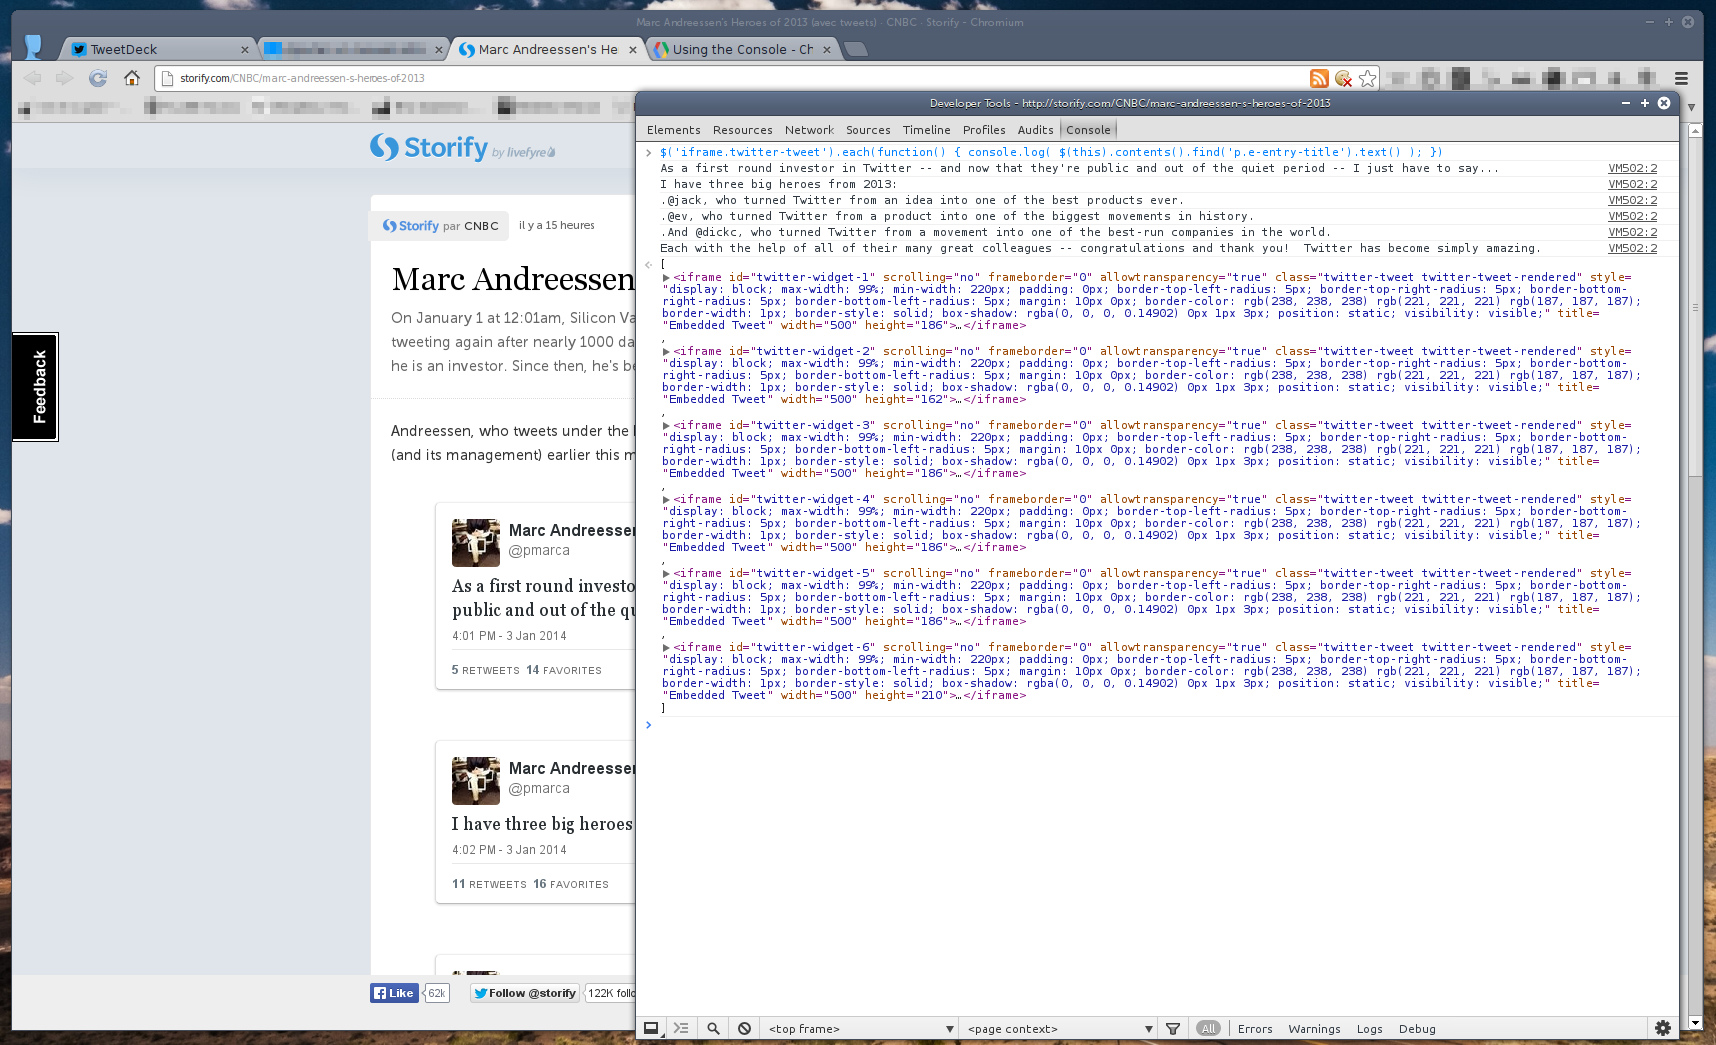
Anyway, rather than cleaner but complicated solutions like coding a small bash script to fetch and parse all the Stories in rough HTML or using the Storify’s developer API, I simply used the Chrome Console. I can’t think of anything simpler:
Use Chrome browser to display all pages of the Story you want to save. All pages, meaning that before doing anything you have to load each and every Tweets in the page; once done loading the first page, scroll to the end of it and click Next Page until you have the complete Story in a long, single page.*
Load the Chrome Console with Ctrl+Shift+j. Refer to the Google doc if that doesn’t work for you. You may see some errors/warnings in the Console, nevermind.
Paste the following code into the Console: $('iframe.twitter-tweet').each(function() { console.log( $(this).contents().find('p.e-entry-title').text() ); }); hit enter.
You should this the plain text Tweets on top with a list of HTML <iframe> tags below. Copy the text and paste it to your Text Editor, replace/delete all occurrences of a weird code at the end of each line, and your done.
*: that’s not actually mandatory, I mean you can get the tweets without loading all of them in the first place, but the point is to get story as plain text so it’ll be easier to do it in one row.
Details: this trick uses jQuery to access all Tweets contents ($('iframe.twitter-tweet').each()), find the Tweets’ plain text message ($(this).contents().find('p.e-entry-title').text()) and display it in the Console (console.log()).
Example:
Export Storify Tweets to plain text using Chrome Console
I didn’t test this on Firefox or any other browser, but it should work pretty much the same.
I’m currently working on some project that requires me to find a way to publish new posts out of specific Twitter accounts’ tweets. Chandesh Parekh already did most part of the work with his Tweets As Posts plugin, which work very well. But I want it to do a bit more, like automatically add featured images to new posts, or specific formatting, basically making the tweet a quote. Here’s the way.
Install Tweets As Posts
Yes, I’ll suppose you know how to do that.
Configure it
Let’s say I want to create a new post each time Pope Francis says something. Could have been the Barack Obama, it doesn’t matter actually, just pick up the Twitter(s) account(s) you want.
Now there’s something I don’t like: you have to enter at least one hashtag and one username to follow. But I don’t want to follow any hashtag, I just want to publish someones tweets so that my readers who aren’t on Twitter can read them.
Hack it
So the first thing we’re doing is getting rid of this: as long as we provide one username or one hashtag, we’re good. Nothing simpler, we just need to edit the tweets-as-posts-admin.php file, line 42:
if($hashtags !="" && $usernames !="") {
becomes
if($hashtags !="" || $usernames !="") {
Now for the rest, we will just wrap the tweets in a <blockquote> tag and add the username after it, along with the date. This time we edit tweets-as-posts-class.php file, starting at line 185:
where $featured_ID is your chosen featured pic’s ID. Just upload your image using WP media tool and spot the ID on the attachment page. If your attachment page’s URI is http://yout-blog.com/?attachment_id=19, then your ID is 19.
And we’re done, we now have some nice posts relaying Twitter messages.
Un petit soucis d’optimisation qui s’est récemment imposé à moi : comment gérer efficacement plusieurs sites WordPress dont certains avec des installations dédiées sur différents serveurs ? En d’autres termes comment administrer tous mes sites à partir d’un seul back-office ? Une solution évidente serait de ne pas avoir plusieurs sites ; mais il est généralement préférable − pour le client autant que pour moi-même − de disposer d’une installation propre pour chaque site géré. Cela d’autant plus que CaerCam et OnEnAGros notamment me servent régulièrement de terrains d’essai pour diverses expérimentations.
La difficulté vient principalement du fait qu’il est question de gèrer plusieurs hébergements différemment, qui chacun accueillent plusieurs sites WordPress, sur une ou plusieurs installations. Après avoir un peu farfouillé sur le net et reçu plusieurs recommandations et idées, je me suis tourné vers une solution un peu bâtarde consistant à mélanger deux services. Idéalement j’aurais aimé pouvoir tout gérer à la manière d’un réseau WordPress, avec l’adminbar en haut de l’écran pour accéder aux différents dashboards ; mais avec plusieurs installations différentes, c’est le bordel pour les mises-à-jour qu’il faut tout de même faire séparément sur les différentes installations. L’option actuelle est donc la suivante :
Installation locale d’InfiniteWP et ajout des différents sites (installation d’un plugin nécessaire) pour l’administration à distance
InfiniteWP n’est pas le seul service de remote control pour WordPress, et je n’ai pas testé tous ses concurrents ; l’intérêt que je lui porte est donc totalement subjectif. Il est gratuit, ce qui en soi est déjà un bon point, et facile à prendre en main. La version payante semble de bonne qualité mais n’offre pas spécialement de fonctionnalités qui vaudraient − dans mon cas − le coup de mettre la main au porte-monnaie. L’ajout de sites se fait par clé, on peut accéder au panneau d’admin directement ou en nouvelle fenêtre, accéder à la rédaction de nouveaux posts, faire et accéder à des backups. Et évidemment faire à distance toutes les mises-à-jours que l’on veut : plugins, thèmes, core.
L’utilisation du réseau WordPress fait un peu doublon avec certaines fonctionnalités d’InfiniteWP, mais présente l’avantage de lier les différents sites entre eux ; par sécurité j’ai préféré installer InfiniteWP uniquement en local, le réseau WP me permet donc d’accéder tout de même à tous mes sites à partir d’un seul dashboard quand je ne suis pas sur ma machine de travail, ce qui est fort utile l’air de rien. Ne manque que la possibilité de mise-à-jour, mais en même temps, je préfère faire mes màj que je suis tranquille chez moi, ça évite de s’arracher les cheveux pendant la moitié du week-end chez les parents.
À voir ce que tout ça va donner en pratique sur le moyen et long terme, mais pour l’instant c’est un fonctionnement plutôt satisfaisant.
Édition : 8 août 2013
Après plusieurs d’utilisation très régulière − WordPress évolue sacrément vite, entre le core et les plugins il y a des mises-à-jours toutes les semaines − l’avis est confirmé : InfiniteWP est un excellent outil, que cela soit pour la gestion des mises à jours, des sauvegardes (fichiers & données) ou l’accès à l’administration des sites puisque InfiniteWP permet d’accéder à la création de nouveaux articles directement depuis son interface : un menu déroulant est lié à chaque site dans la barre latérale et donne accès direct au dashboard, à l’éditeur et autres. Vraiment pratique. Quelques captures d’écrans pour donner un aperçu de l’engin :
Twitter Eggs at OSCON By Garrett Heath − http://www.flickr.com/photos/garrettheath/9359575921/
The first time I went through the login process of WordPress, I told myself I would probably have to take some time to customize a bit that page. That was, well, four or five years ago.
I’m not telling that WordPress default login is useless, ulgy or badly crafted; I’m merely stating that it could get some improvement. If you’re working on a fully custom design like, like myself these days, you might find disturbing to have a login page totally ruining your graphical coherency. I have this nice dark blue and blood red design, my client wants to log himself in, boom, blank white page with orange links and blue buttons. Well, we’re gonna get rid of that.
Firsts statements
As usual, WordPress provides us with a built-in method to include a login form pretty much everywhere we want, called wp_login_form. But don’t rush out there to learn the Codex page by heart, we won’t be using this method here, and here’s why.
There’s a lot of ways to customize WordPress’ login page, but almost every page example I found are just basic CSS modifications passed through actions in functions.php. Problem is, this won’t allow us to change anything in the structure of the page, just its display. And that’s not what I want to do. I want to be able to choose where my elements will be placed, I want my inputs to have default values. There’s a fairly simple way to do this.
Fear the Core
We could just break out the chainsaw and hack through the wp-login.php file, but leaving WordPres’ Core is a good habit to keep. So we’re just going to add a tiny page to the Core, which we’ll put in WordPress’ root folder: wp-log-in.php. Now we need our visitors/clients to get to that page when they try to identify themselves; that we will do by adding the following code in our theme’s functions.php file:
Every time the site_url method is called, except when logging out, « wp-login.php » is replaced by « wp-log-in.php », loading our custom page instead of the default WordPress page. We want to have a logout exception simply because wp-login.php doesn’t only handle the login form but is part of the whole loggin/out process. Better leave that as it is!
Designing our own login page
Now this up to you and to what you want or don’t want to be in your page. I’ll give my own current experiment as a working base. Looks like this:
WordPress login page redesign
Changes made: get rid of the title link, « go back to blog » link, input labels, and added input default values. Added some jQuery to restore default values when the form is out of focus.
Stylesheet and jQuery code can be put in separate files or inside the page. This example should be fully W3C valid for HTML 5 and CSS 3 except the submit button due to the use of background-image gradient that needs multi browser variants. I usually don’t use these variants for box-shadow, border-radius and classic CSS 3 properties that most browsers support anyway.
Il est plutôt rare que j’achète quelque chose en matière d’informatique, et plus encore de logiciel, alors acheter un plugin, pour WordPress en plus, ça frôle l’exclusivité décennale… Je privilégie essentiellement l’utilisation des logiciels libres, que cela soit pour un usage personnel ou professionnel ; ça me permet de développer moi même mes modifications en toute légalité et de pouvoir le cas échéant les redistribuer pour qu’elles ne servent pas qu’à moi seul.
Alors pourquoi acheter un truc que j’aurais pu faire moi-même ? Parce que bien souvent, ce ne sont pas les capacités qui manquent, mais le temps. Pour la nouvelle mise-à-jour d’OnEnAGros! sur laquelle je travaille depuis quelques semaines, il me fallait un bon mega-menu ; vous savez, ces menus composés de sous-menus bien agencés que vous pouvez trouver sur des sites comme celui de la Fnac, CDiscount, etc. Des menus complexes, avec des liens, des boites, des sous-menus, des images, des widgets, etc. Ça peut rendre certains allergiques, mais il n’empêche que bien utilisés, c’est un gros plus pour l’ergonomie de certains types de sites.
Or pour obtenir moi-même un résultat correct qui s’intègre parfaitement à WordPress, il m’aurait fallu des semaines de travail ; pour avoir un plugin complet qui puisse être, à terme, utilisés par des néophytes, c’est en mois qu’il faudrait compter. Et j’aime pas ré-inventer le roue, moi, surtout quand Chris Mavricos l’a déjà fait en vachement mieux que tout ce que je pourrais faire de mon côté.
UberMenu, pour la modique somme de $16, fournit un excellent megamenu pour WordPress, paramétrable à souhait sans aucune retouche de code nécessaire, même si je n’ai pas pu m’empêcher d’aller ajouter deux-trois bricoles persos, on ne se refait pas. Le panneau d’administration est très complet, permet de gérer une foule d’options pour paramétrer le ou les menus, la gestion de ces derniers se faisant par la partie classique de gestion des menus de WordPress. On peut ajouter des Widgets directement dans les menus, des liens (encore heureux) mis en forme par listes multi-colonnes (c’est mieux), avec des miniatures (encore mieux !), le tout avec la présentation qu’on veut.
Bref, un gain de temps important pour gérer un menu relativement simple comme celui d’OnEnAGros!, mais qui devient phénoménal pour un menu comme celui d’un thème pour restaurant/brasserie sur lequel je travaille également en ce moment, où il y a énormément de choses à intégrer : différents menus, carte des vins, des desserts, tarifs, contact, localisation, photos et vidéos, galeries, etc etc. Ma précédente solution pour avoir un rendu similaire consistait à spécifier mes styles persos via le champ « Titre » des éléments de menu, et passer le menu dans une fonction spécifique pour ajouter les styles et la mise en forme comme je le voulais. Sans même parler du principe bordélique, ça imposait aussi d’ajouter un nouvel élément à ma feuille de style à chaque fois que j’ajoutais un truc dans le menu. Vraiment pas pratique. Cling, $16, problèmes résolus, avec en plus la satisfaction d’avoir aidé un développeur compétent et talentueux à continuer de bosser. Que demande le peuple 🙂
Note : seul point négatif d’UberMenu, il est entièrement en anglais. Qui sait, j’aurais peut-être le temps d’en faire une version française un de ses quatre…
Now this is an issue I encountered while designing some WordPress themes: posts and specifically pages don’t display in real date order. I still can’t precisely tell why this is happening, but it does, and it actually bothers me a bit since most of my websites use a precise page hierarchy. So here we go, short analyse and my personal solution.
Classic WordPress usage
WordPress provides simple functions to get pages/posts, and an easy way to order them by passing parameters through the functions. You can use get_posts or, in my case, get_pages; get_posts uses orderby (all available values here), get_pages uses sort_column (all available values here). You’d expect the following example to list you all your published pages ordered by date, latest first:
Well, that works great for me, as long as I don’t ever modify again one single page after I published it. If I edit a page, then post_modified is set to a new date, and that page will appear as the latest published… Which can be quite annoying.
I spent a couple of hours browsing the web, reading docs and trying to find why this is happening, not a clue up to now, be welcome to enlighten me if you have one! Still, I ended with a homemade solution: a little custom function to reorder my pages properly.
function sort_pages_by_realdate()
We just have to add this to our theme’s functions.php:
That’s it 🙂 The important point is to use the posts’ timestamps to compare, not merely post_date. Also note that using krsort() is not an obligation; it depends of the pages order you want. usort will leave you a table ordered from the most ancient pages to the most recent; I use krsort() to reverse the array because I want the latest page by date to be the first listed, so don’t use it if you don’t want that specific order.